Monday, August 10, 2015

Mystery Smock

Series II

"Up and Down"


I have been doing Mystery Smocks on my Facebook page for several years now and they have been extremely successful.  They're so popular in fact, that recently a national smocking organization has started doing Mystery Smocks, but for members only.  Mine have always been free to whomever would like to follow along, no membership needed, so I thought "Why not see how well they go over on the blog?"   

If you've never participated in a Mystery Smock Along before, you're in for a real treat! It's fun, it's exciting and it's a mystery.  Here are some things you should know before you decide to take part:

How to Pleat Fabric
How to locate the Center Valley or the Center Pleat
How to Smock a Cable, Trellis, Outline, Stem and combinations thereof
How to follow directions without having a photo of the finished product!

How to work a bullion rose OR a bullion daisy
How to work a lazy daisy
How to add beads or buttons and surface embroidery to smocking for embellishment

Once the plate is finished, you will have a finished insert to use how you see fit!

Instructions

Pleat a 9"x 44" length of fabric with 18 full-spaced rows. I designed this plate on cotton, but you can use whatever fabric you like.

Tie off only one end. That being said, if you're going to use this insert in a dress, you may want to block to size, so you would need to tie off both ends. I didn't and it's my habit not to.

Also, do not knot the smocking threads at the end of a row. Leave the tail, too. Many times I've noticed an error in row 1 only when I started to smock row 2. This is definitely a life and time saver.  I used 3 strands of DMC Floss and DMC Perle Coton #8.

You will need a #20 tapestry needle, a #5 milliner needle and a #7 darner needle for smocking

Pick 3 hues of the same color and label them 1a [this should be lightest tone], 1b [this should be a medium tone, and 1c [this should be the deepest tone]  These colors will be the center of the design and the focal point of the insert.

Pick 2 contrast, but not conflicting colors 2a [medium tone] and 2b [deep tone]. These colors will help to focus the eye on the center of design.

Pick 3 more hues of another color as your surface embroidery colors to work flowers and then a shade of green to work the leaves. These 3 colors are 3a [the lightest color], 3b [a medium color], and 3c [ the deepest color].

First Clue -    Single cable, 4-Step-trellis motif. Use a #7 darner needle and 3 strands of floss.

Row 7
Use color 1b [medium tone]. Begin with a Down Cable over the Center Valley [CV]. Work a 4-Step trellis Up to Row 6. Work an Up Cable. Work a 4-Step trellis Down to Row 7. Work a Down Cable. Repeat across the Row. Do not knot off.  Turn work upside down and work in same manner across to the opposite side.


Wednesday, August 6, 2014

I Love Shiny Things...


My First Brazilian Embroidery
My favorite shiny thing is glossy thread, and the glossiest thread bar none, is rayon. Over the course of my stitching career, I've taken several classes and workshops in Brazilian embroidery. I love the brilliant colors and the way the thread lays but above all I love the glossy shine over the finished project. When I was new to Brazilian embroidery, it felt unique to me, not because the stitches were different, but because every thread used is rayon. Threads come in varying weights; from very fine to very heavy. All traditional stitches and techniques are the same only the thread, and how you treat it, are different.

The big difference I found is how rayon thread should be prepped before stitching. The first thing that's required, once you've gathered up your supplies, is to get "rid of" or "tame" the hard-to-remove memory. All viscose threads have a built-in "memory" and it's stubborn. The curling and twisting is quite visible the minute you take it out of the package. So, what do you do to get that thread to untwist?  Steam. Steam is the easiest and quickest way to straighten the thread without getting it "wet" and that's nice because you can stitch right after straightening without having to wait for the thread to dry [another way to straighten rayon thread is to dampen it]. Boil the water and as soon as the kettle or pot is hot enough and the steam begins to billow up, the pot is ready to straighten the thread. Simply take out and unwind the skein of thread as you pass it through the steam. Amazingly, the thread begins to unwind and become straight. Don't rewind it, just loosely gather it up in a neatened circle while you stitch.  If it starts to curl back up, simply pass it through the steam again and voila, problem is solved. The other necessity when using rayon threads is making sure that you split the thread with your needle when ending your stitching, as you take your thread to the back. On the back of your work, it's a good practice to use a teeny, tiny bit of of Fray Check on the thread tails [and the tails only] when tying off. Make sure not to get any of the Fray Check on your foundation fabric. It doesn't come out and it will age with a yellowish tinge.

Now, that being said, I have quite a few friends that have also taken a fancy to rayon thread and have begun using it in their smocking and heirloom sewing, either by hand or machine embroidery. My caution is this: although rayon begins as a natural cellulose product from wood, the processes required in order to develop it into a fiber are caustic and not conducive to the whole idea of heirloom sewing, which is to create garments that can and will be passed from generation to generation looking as if they were just made. If you are going to create an embroidered piece to frame and then hang, this fiber is wonderful and suitable for that, but, it is not suitable, in my opinion, for heirloom sewing. There are so many chemicals used to break down and create rayon thread that at the end of the process it doesn't resemble anything "natural". Processed wood cellulose has been treated or bathed in lignin, caustic soda, carbon disulfide and sulfuric acid. If you're protective of your scrap booking and refuse to use products containing lignin because you know what it will do to your photos, can you imagine what lignin, not to mention residual sulfuric acid, will do to your cotton heirlooms? Exactly. No matter how much I love this thread, I will not use it in my heirloom sewing and especially not in my smocking. Just one gal's opinion.

Below is a mini-education on how wood cellulose is processed to produce rayon thread.

Regular rayon (or viscose) is the most widely produced form of rayon. This method of rayon production has been utilized since the early 1900s and it has the ability to produce either filament or staple fibers. The process is as follows:
  1. Cellulose: Production begins with processed cellulose
  2. Immersion: The cellulose is dissolved in caustic soda: (C6H10O5)n + nNaOH → (C6H9O4ONa)n + nH2O
  3. Pressing: The solution is then pressed between rollers to remove excess liquid
  4. White Crumb: The pressed sheets are crumbled or shredded to produce what is known as "white crumb"
  5. Aging: The "white crumb" is aged through exposure to oxygen
  6. Xanthation: The aged "white crumb" is mixed with carbon disulfide in a process known as Xanthation, the aged alkali cellulose crumbs are placed in vats and are allowed to react with carbon disulfide under controlled temperature (20 to 30 °C) to form cellulose xanthate: (C6H9O4ONa)n + nCS2 → (C6H9O4O-SC-SNa)n
  7. Yellow Crumb: Xanthation changes the chemical makeup of the cellulose mixture and the resulting product is now called "yellow crumb"
  8. Viscose: The "yellow crumb" is dissolved in a caustic solution to form viscose
  9. Ripening: The viscose is set to stand for a period of time, allowing it to ripen: (C6H9O4O-SC-SNa)n + nH2O → (C6H10O5)n + nCS2 + nNaOH
  10. Filtering: After ripening, the viscose is filtered to remove any undissolved particles
  11. Degassing: Any bubbles of air are pressed from the viscose in a degassing process
  12. Extruding: The viscose solution is extruded through a spinneret, which resembles a shower head with many small holes
  13. Acid Bath: As the viscose exits the spinneret, it lands in a bath of sulfuric acid, resulting in the formation of rayon filaments: (C6H9O4O-SC-SNa)n + ½nH2SO4 → (C6H10O5)n + nCS2 + ½nNa2SO4
  14. Drawing: The rayon filaments are stretched, known as drawing, to straighten out the fibers
  15. Washing: The fibers are then washed to remove any residual chemicals
  16. Cutting: If filament fibers are desired the process ends here. The filaments are cut down when producing staple fibers[1]
High wet modulus rayon (HWM) is a modified version of viscose that has a greater strength when wet. It also has the ability to be mercerized like cotton. HWM rayons are also known as "polynosic"[clarification needed] or can be identified by the trade name Modal.[9]
High-tenacity rayon is another modified version of viscose that has almost twice the strength of HWM. This type of rayon is typically used for industrial purposes such as tire cord.[9]
Cupramonium rayon has properties similar to viscose but during production, the cellulose is combined with copper and ammonia (Schweizer's reagent). Due to the environmental effects of this production method, cupramonium rayon is no longer produced in the United States.[9]

Monday, February 13, 2012

Smocked Padded Hanger


Finished Hanger

This is the finished project; an adult-size smocked padded hanger. You may pad your own hanger, if you know how, but for this tutorial I will be using a purchased padded hanger. The smock plate used for this project is an original design by Barbara Meger, published in the July/August,1994 Issue of Creative Needle. The only difference is that Ms. Meger used silk ribbon to smock with and I used DMC Pearl Cotton #8.

Supplies:

1/4 yard fabric [9”x45”] - batiste or broadcloth - torn or cut on grain
2 1/2 yards of flat or pre-gathered lace
1/2 yard narrow ribbon for bow
1 Purchased pre-padded hanger

Step 1

Fold your fabric lengthwise so that the raw edges meet and steam press to set-in a crease. This crease will not show in your finished project.


Once pressed, fold your fabric in half width-wise and press again, but be sure not to press over the first lengthwise crease.


The center of your fabric lies where the two creases cross. Continue on to Step 2.

Step 2


BEFORE STITCHING ON YOUR HANGER FABRIC, PLEASE READ ALL INSTRUCTIONS FIRST. Practice the “ROLL AND WHIP” method of joining flat lace to flat fabric on scrap material before attempting on your project.

1. On the long side of your fabric and with right sides together, place the header of the lace about 1/8” away from the raw edge of the fabric, join the lace to the fabric using a short straight stitch [1.0 - 1.5]. Sew down the center of the lace header. Do not trim seam. Press seam on medium heat iron to set the stitches.

2. Next, sew along this same seam with a short and narrow zig-zag stitch. Adjust the zig-zag length shorter than normal (about 1.5 - 2.0, depending on your machine). Adjust the zig-zag width to a narrow width (2.0 - 2.5, depending on the size of the header on your lace). As you sew, the 1/8” of fabric should “roll over” and cover the header of the lace. If it does not, adjust your width and/or length of the zig-zag settings so that it does.

Step 3


1. In the center of your fabric [how to fine center see Step 1] create a buttonhole large enough to accommodate your padded hanger’s hook. You may make a machine buttonhole OR work a hand buttonhole, whichever you prefer.   It is easier to finish this opening now while the fabric is flat, instead of after smocking.

Step 4


Once your lace has been attached and your buttonhole made, roll your fabric on a dowel slowly and carefully. Use the crease to help keep you straight and on grain. If you are someone who folds rather than rolls the fabric, make sure to keep the crease down the center as you fold as well. It will be very helpful when you begin to pleat. Continue on to Step 5.


Step 5
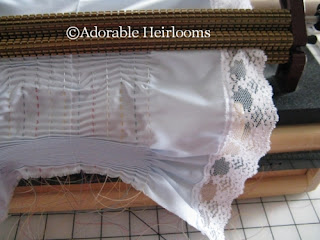
Once the fabric has been rolled onto the dowel. Position the dowel in the pleater so that the crease is in the divet of the bar and so that there 6 rows on each side of the crease as in the photo.

Step 6

Continue pleating to the end of the fabric, using the center crease as your guide to keep your fabric straight and on-grain. Once pleated, you can smock using the plate given in Step 1 OR you can use one of your own. *Note: Rows 1, 6, 7 and 12 will not be smocked if using the Barb Meger pattern. If you use a pattern of your choice, remember to leave these same rows unsmocked as well.


Step 7 - Assembly

Remove the pleating threads
Finish the raw edges either by serging or by simply zig-zaging each raw edge
Bring the right sides of the finished short ends together and stitch using about a 2.0 length, then turn right side out
Insert your hanger “hook” through the finished hole and pull the fabric gently, but firmly down over the padded hanger. You may have to stretch it a bit to fit - this is normal
Using regular hand sewing thread close the bottom opening from underneath by taking a small stitches behind the lowest smocked row and travel from side to side. Take care and make sure your stitches do not show on the top. Draw up snuggly, but do not distort your smocking when doing so

NOTE: If you would like to make a child’s sized smocked hanger simply cut 8 inches off of a standard wooden hanger [4” off each side”]. Pad the hanger by wrapping strips of polyester batting around the shortened hanger - be sure to cover the “cut ends” as well - you may need to take a stitch or two to keep it in place, but for the most part the batting sticks to itself. Shorten the starting width of the fabric from 45” wide to 35” wide, as you won’t need as many smocked repeats. Follow the rest of the steps in the tutorial to finish the child’s sized hanger.

Post questions or photos of your finished hangers here!


Saturday, January 28, 2012

Time and Inspiration

Where do you get your inspiration?  From nature, from fashion magazines, where?  For me, inspiration can strike anywhere, anytime.  Even the most seemingly mundane things can give me some kind of "artistic" inspiration ~ which usually means I get the "need" to sew.  Once I saw a gift bag divided in unequal thirds.  The colors were hot pink, lime green and black with white polka dots and I thought, "That would make a great dress combination." The problem is that usually when inspiration strikes, I'm not always behind my machine OR I don't have paper and pencil handy to so I can write down my ideas.  Has that ever happened to you?  What do you do to make sure that your great idea doesn't become a memory?