Finished Hanger
This is the finished project; an adult-size smocked padded hanger. You may pad your own hanger, if you know how, but for this tutorial I will be using a purchased padded hanger. The smock plate used for this project is an original design by Barbara Meger, published in the July/August,1994 Issue of Creative Needle. The only difference is that Ms. Meger used silk ribbon to smock with and I used DMC Pearl Cotton #8.
Supplies:
1/4 yard fabric [9”x45”] - batiste or broadcloth - torn or cut on grain
2 1/2 yards of flat or pre-gathered lace
1/2 yard narrow ribbon for bow
1 Purchased pre-padded hanger
Step 1

Fold your fabric lengthwise so that the raw edges meet and steam press to set-in a crease. This crease will not show in your finished project.

Once pressed, fold your fabric in half width-wise and press again, but be sure not to press over the first lengthwise crease.

The center of your fabric lies where the two creases cross. Continue on to Step 2.
Step 2

BEFORE STITCHING ON YOUR HANGER FABRIC, PLEASE READ ALL INSTRUCTIONS FIRST. Practice the “ROLL AND WHIP” method of joining flat lace to flat fabric on scrap material before attempting on your project.
1. On the long side of your fabric and with right sides together, place the header of the lace about 1/8” away from the raw edge of the fabric, join the lace to the fabric using a short straight stitch [1.0 - 1.5]. Sew down the center of the lace header. Do not trim seam. Press seam on medium heat iron to set the stitches.
2. Next, sew along this same seam with a short and narrow zig-zag stitch. Adjust the zig-zag length shorter than normal (about 1.5 - 2.0, depending on your machine). Adjust the zig-zag width to a narrow width (2.0 - 2.5, depending on the size of the header on your lace). As you sew, the 1/8” of fabric should “roll over” and cover the header of the lace. If it does not, adjust your width and/or length of the zig-zag settings so that it does.
Step 3

1. In the center of your fabric [how to fine center see Step 1] create a buttonhole large enough to accommodate your padded hanger’s hook. You may make a machine buttonhole OR work a hand buttonhole, whichever you prefer. It is easier to finish this opening now while the fabric is flat, instead of after smocking.
Step 4
Once your lace has been attached and your buttonhole made, roll your fabric on a dowel slowly and carefully. Use the crease to help keep you straight and on grain. If you are someone who folds rather than rolls the fabric, make sure to keep the crease down the center as you fold as well. It will be very helpful when you begin to pleat. Continue on to Step 5.
Step 5
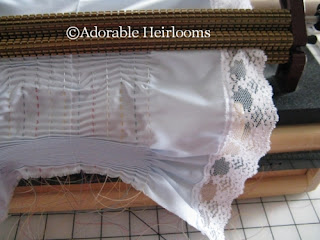
Once the fabric has been rolled onto the dowel. Position the dowel in the pleater so that the crease is in the divet of the bar and so that there 6 rows on each side of the crease as in the photo.
Step 6
Continue pleating to the end of the fabric, using the center crease as your guide to keep your fabric straight and on-grain. Once pleated, you can smock using the plate given in Step 1 OR you can use one of your own. *Note: Rows 1, 6, 7 and 12 will not be smocked if using the Barb Meger pattern. If you use a pattern of your choice, remember to leave these same rows unsmocked as well.
Step 7 - Assembly
Remove the pleating threads
Finish the raw edges either by serging or by simply zig-zaging each raw edge
Bring the right sides of the finished short ends together and stitch using about a 2.0 length, then turn right side out
Insert your hanger “hook” through the finished hole and pull the fabric gently, but firmly down over the padded hanger. You may have to stretch it a bit to fit - this is normal
Using regular hand sewing thread close the bottom opening from underneath by taking a small stitches behind the lowest smocked row and travel from side to side. Take care and make sure your stitches do not show on the top. Draw up snuggly, but do not distort your smocking when doing so
NOTE: If you would like to make a child’s sized smocked hanger simply cut 8 inches off of a standard wooden hanger [4” off each side”]. Pad the hanger by wrapping strips of polyester batting around the shortened hanger - be sure to cover the “cut ends” as well - you may need to take a stitch or two to keep it in place, but for the most part the batting sticks to itself. Shorten the starting width of the fabric from 45” wide to 35” wide, as you won’t need as many smocked repeats. Follow the rest of the steps in the tutorial to finish the child’s sized hanger.
Post questions or photos of your finished hangers here!


Thank you so much for explaining how you make these beautiful hangers! I saw it on Pinterest but it didn't link to your blog, so I went hunting on Google & found you that way.
ReplyDeleteI'm your newest follower & look forward to learning more from you!
Thanks!
fondly,
Rett
forgot to say I pinned this properly! I hope you don't mind!
ReplyDeleteThank you so much Rettabug! Have you made one yet?
ReplyDelete